Introduction
I still remember the first time I decided to change oil myself. I was not chasing savings alone. I wanted control over something that directly affected engine health, fuel efficiency, and long term reliability. For many drivers, how to change oil feels mysterious or risky, yet it remains one of the most basic and empowering maintenance tasks you can learn.
In the first few minutes of searching, most people want a straight answer. Yes, you can change oil at home safely. Yes, it takes about 30 to 60 minutes once you understand the process. And yes, it saves money while helping you notice small issues before they become expensive repairs. Modern vehicles typically require an oil change every 3,000 to 10,000 miles depending on oil type, driving habits, and manufacturer guidance. Your owner’s manual always has the final word.
Changing oil matters because engine oil lubricates moving parts, reduces heat, traps contaminants, and prevents premature wear. When oil degrades, friction increases and engines suffer quietly until damage becomes obvious and costly. I approach this guide as a practical walkthrough, not a shortcut list. I focus on safety, clarity, and real world experience.
By the end, you will understand the tools you need, the correct sequence of steps, how to avoid common mistakes, and how to dispose of used oil responsibly. More importantly, you will know why each step matters, which is what turns a task into a skill.
What You Need Before You Start
Preparation determines whether an oil change feels smooth or stressful. I always set everything out before lifting the car.
Essential Tools and Supplies
| Item | Purpose | Typical Cost |
|---|---|---|
| Engine oil | Lubricates engine components | $25 to $60 |
| Oil filter | Traps contaminants | $8 to $20 |
| Wrench or socket set | Removes drain plug | $15 to $40 |
| Oil filter wrench | Loosens tight filters | $10 to $25 |
| Drain pan | Catches used oil | $10 to $30 |
| Funnel | Prevents spills during refill | $3 to $10 |
| Jack and jack stands or ramps | Lifts vehicle safely | $60 to $150 |
Your owner’s manual specifies oil viscosity such as 5W-30 and total capacity, often between 4 and 6 quarts. Never guess these values.
Helpful Safety Add Ons
| Item | Why It Helps |
|---|---|
| Gloves and shop towels | Reduce burns and mess |
| Wheel chocks | Prevent rolling |
| Torque wrench | Avoid stripped threads |
| Flashlight | Improves visibility under engine |
As automotive technician Chris Fix explains, “Most oil change problems come from rushing setup, not from the oil itself.” That matches my experience every time.
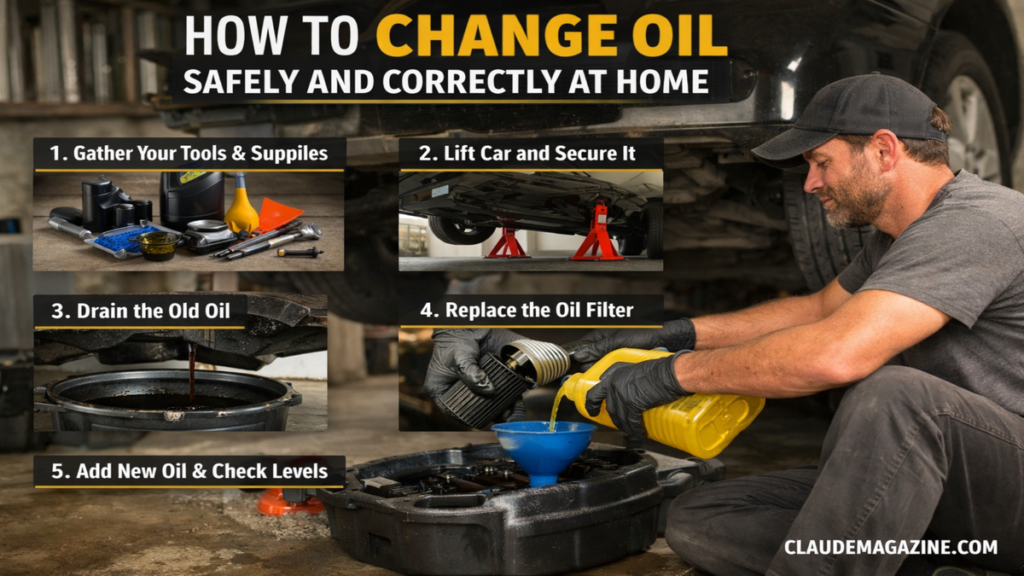
Step by Step Oil Change Process
Step 1: Warm the Engine and Secure the Car
I start by running the engine for two to three minutes. Warm oil flows faster and drains more completely, but it should never be hot to the touch. Park on level ground, engage the parking brake, and place wheel chocks behind the rear tires.
Lift the vehicle using ramps or a jack with stands. Never rely on a jack alone. According to the National Safety Council, improper vehicle support is a leading cause of home garage injuries. Stability comes first.
Step 2: Drain the Old Oil
Position the drain pan beneath the oil pan, usually centered under the engine. Using a wrench, loosen the drain plug counterclockwise. I keep slight inward pressure on the plug until the final thread releases, then pull it away quickly to avoid oil on my hand.
Allow the oil to drain for five to ten minutes. This pause matters more than people think. SAE research shows residual contaminants decrease significantly when oil fully drains rather than being rushed.
Inspect the drain plug washer. Replace it if crushed or damaged.
Step 3: Replace the Oil Filter
Locate the oil filter, often cylindrical and mounted on the engine block. Loosen it counterclockwise by hand or with a filter wrench. Expect more oil to spill.
Before installing the new filter, I dip a finger in fresh oil and lightly coat the rubber gasket. This ensures a proper seal and easier removal next time. Hand tighten until the gasket contacts the surface, then add about three quarters of a turn. Over tightening causes leaks and filter damage.
Step 4: Reinstall the Drain Plug
Wipe the drain hole clean and reinstall the plug by hand first to avoid cross threading. Tighten to the manufacturer’s torque specification, commonly 20 to 30 foot pounds. Mechanical engineer and automotive educator Jason Fenske notes, “Stripped drain pans are almost always the result of ignoring torque specs.” I agree completely.
Step 5: Refill with New Oil
Lower the vehicle to level ground. Remove the oil fill cap under the hood and insert a funnel. Pour in about 80 percent of the required oil, then check the dipstick.
Add oil gradually until the level sits between the minimum and maximum marks. Overfilling can cause foaming and pressure issues, so patience pays off.
Step 6: Run and Recheck
Start the engine and let it idle for 30 to 60 seconds. Check underneath for leaks. Shut the engine off, wait two minutes, then check the dipstick again and top off if needed.
This final check is where confidence replaces doubt.
Choosing the Right Oil Type
Oil choice affects service intervals, engine cleanliness, and long term wear. I see many drivers confused here, so clarity matters.
| Oil Type | Best For | Typical Change Interval |
|---|---|---|
| Conventional | Older engines, short trips | 3,000 to 5,000 miles |
| Synthetic blend | Moderate driving conditions | 5,000 to 7,500 miles |
| Full synthetic | Newer engines, extreme temps | 7,500 to 10,000 miles |
Automotive engineer Lake Speed Jr. has said, “Modern engines are designed around oil chemistry, not just lubrication.” That explains why manufacturers increasingly specify synthetic oil even when conventional seems cheaper upfront.
Common Mistakes and How to Avoid Them
I have made at least one of these mistakes early on, which is why I highlight them clearly.
- Forgetting to reinstall the drain plug before refilling
- Over tightening the oil filter
- Using the wrong oil viscosity
- Ignoring disposal rules
- Skipping the final leak check
Each mistake is preventable with a calm pace and checklist mindset. When in doubt, stop and verify rather than guessing.
Proper Oil Disposal and Environmental Responsibility
Used motor oil is hazardous waste. One gallon can contaminate one million gallons of water according to the Environmental Protection Agency. I always pour used oil into the empty oil containers and seal them tightly.
Most auto parts stores and municipal recycling centers accept used oil and filters for free. Never dump oil in drains, soil, or trash. Responsible disposal is part of responsible maintenance.
Takeaways
- Changing oil at home is safe when preparation and stability come first
- Always follow your owner’s manual for oil type and capacity
- Warm oil drains more completely but should not be hot
- Hand tightening filters prevents leaks and damage
- Torque specifications matter more than strength
- Synthetic oil extends intervals but costs more upfront
- Proper disposal protects the environment and your community
Conclusion
I view learning how to change oil as more than a cost saving move. It builds mechanical awareness and confidence that carries into other areas of car ownership. When you understand what flows through your engine and why it matters, maintenance stops feeling abstract.
A careful oil change supports smoother performance, longer engine life, and fewer surprises between service visits. The process rewards patience and attention rather than speed. Over time, it becomes routine rather than intimidating.
If you are unsure during your first attempt, pause and reference your manual or a model specific guide. There is no penalty for caution. What matters is completing each step with intention.
Knowing how to change oil places you back in control of one of the most important aspects of vehicle care. That sense of control is often what keeps drivers proactive instead of reactive.
Read: Online Casino Zonder CRUKS Storemicgadget.com Explained
FAQs
How often should I change oil?
Most vehicles need oil changes every 3,000 to 10,000 miles depending on oil type and driving conditions. Always follow your manufacturer’s recommendation.
Can I mix different oil brands?
Yes, as long as viscosity and specifications match. Mixing brands is less ideal than using one type consistently but safe in practice.
What happens if I overfill oil?
Overfilling can cause foaming, increased pressure, and seal damage. Drain excess oil immediately if levels exceed the maximum mark.
Is synthetic oil worth it?
Synthetic oil lasts longer and performs better in extreme temperatures. It costs more upfront but often saves money over time through extended intervals.
Do I need to replace the oil filter every time?
Yes. A new filter ensures contaminants do not circulate back into fresh oil.
References
American Petroleum Institute. (2023). Engine oil basics and viscosity ratings. https://www.api.org
Environmental Protection Agency. (2024). Managing used motor oil. https://www.epa.gov
Society of Automotive Engineers. (2022). Lubrication fundamentals for passenger vehicles. https://www.sae.org